And Then the Searchlight Which Has Been Turned on the World Was Turned Off Again
In this Arduino tutorial I volition evidence you lot how to turn an LED on and off with a button. In fact, nosotros'll practice two slightly different applications.
Beginning, we will ability on the LED when the button is pressed, and power off the LED when the button is not pressed.
So we'll modify the program to toggle the LED's country only when nosotros release the button.
For more info on each component, as well check out this Arduino LED tutorial and this Arduino push button tutorial.
Permit'southward get started!
Arduino circuit with an LED and a push button
To build the excursion you volition need those components:
You are learning how to use Arduino to build your own projects?
Bank check out Arduino For Beginners and learn step past footstep.
- Arduino board (any lath, if you don't have Uno you lot can easily adapt by finding corresponding pins).
- Breadboard.
- LED – any color.
- Push button.
- 220 Ohm resistor for the LED. If you don't have this specific value, any resistor from 330 to 1k Ohm volition do.
- 10k Ohm resistor for the push button button. If y'all don't have, you tin go until 20k-50k Ohm.
- A bunch of male person to male person wires (including if possible black, red, and other colors).
Hither'south the circuit y'all have to make.
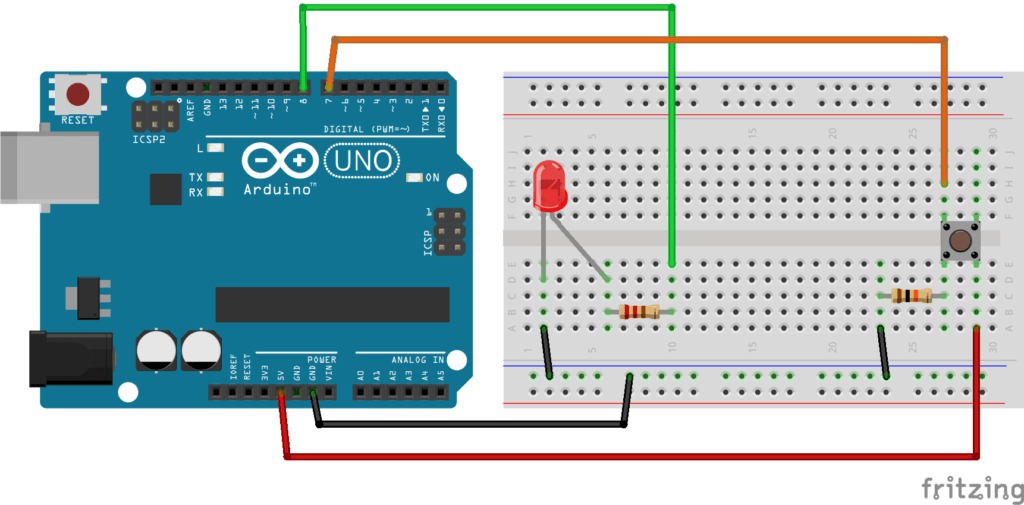
Pace by step instructions to build the circuit (more than info about Arduino pins here):
- Commencement, make sure to power off your Arduino – remove any USB cablevision.
- Plug a black wire between the blueish line of the breadboard and a ground (GND) pin on the Arduino lath.
- Plug the LED. You can notice that the LED has a leg shorter than the other. Plug this shorter leg to the basis (bluish line here) of the excursion.
- Connect the longer leg of the LED to a digital pin (hither pin no 8, you lot tin can change it). Add a 220 Ohm resistor in between to limit the current going through the LED.
- Add the push button to the breadboard, like in the picture.
- Connect one leg of the button to the ground, and put a 10k Ohm resistor in between. This resistor volition act as a "pull downward" resistor, which ways that the default push's state will be LOW.
- Add a red wire betwixt some other leg of the button and VCC (5V).
- Finally, connect a leg of the push (same side as the pull down resistor) to a digital pin (hither 7).
All right your circuit is now finished. You can outset writing code.
Hither's a video that might assistance you get started (but for the LED, not the push push) with the circuit and the code:
Subsequently watching the video, subscribe to the Robotics Back-Cease Youtube channel and then yous don't miss the next tutorials!
Plough on the LED when push is pressed, plough it off otherwise
What we want to achieve is unproblematic: when the button is not pressed, the LED is off. And when nosotros printing the button the LED should be on.
The lawmaking
#ascertain LED_PIN 8 #define BUTTON_PIN 7 void setup() { pinMode(LED_PIN, OUTPUT); pinMode(BUTTON_PIN, INPUT); } void loop() { if (digitalRead(BUTTON_PIN) == HIGH) { digitalWrite(LED_PIN, Loftier); } else { digitalWrite(LED_PIN, LOW); } } Let'southward pause this code downwards line past line.
Setup
#define LED_PIN 8 #define BUTTON_PIN 7
First, every bit a all-time practice, we utilize some defines to keep the pin number for the LED and button. That way, if you take used unlike pins than I, yous simply demand to change those ii lines. Likewise, in the future if you desire to modify the LED from pin 8 to pin 11 for example, you tin modify this line without touching anything else in the code.
void setup() { pinMode(LED_PIN, OUTPUT); pinMode(BUTTON_PIN, INPUT); } The setup function is executed in one case at the beginning of the plan. This is the perfect time to initialize our pins with the pinMode() office:
- OUTPUT for the LED, every bit we're going to write data to it.
- INPUT for the push button, as we're going to read data from information technology.
Now, the digital pins are correctly gear up up.
Loop – Turn on the LED when button is pressed
void loop() { if (digitalRead(BUTTON_PIN) == High) { digitalWrite(LED_PIN, HIGH); } else { digitalWrite(LED_PIN, Low); } } In the loop role, we outset past reading the button's land with the digitalRead() part. As we have a pull down resistor on the push, we know that the not-pressed state will give the states the value Depression.
(Note: if you were using a pull upwardly resistor, or no resistor at all – with the INPUT_PULLUP option for pinMode – this would be the opposite. HIGH when the button is not pressed, and Low when information technology's pressed.)
So, once nosotros become the push'southward state, we bank check if information technology's HIGH or LOW:
- Loftier (pressed): we power on the LED with digitalWrite() and the Loftier state.
- LOW (not pressed): we power off the LED with digitalWrite() and the LOW state.
OK, at present permit's do something a niggling bit more complex.
Toggle LED's state with the push button – first iteration
What we desire to do is to toggle the LED's land when you press + release the push. Then, the first time you release the push button, the LED volition turn on. The 2d time, information technology volition turn off. Etc.
The code
#ascertain LED_PIN 8 #define BUTTON_PIN 7 byte lastButtonState = Low; byte ledState = LOW; void setup() { pinMode(LED_PIN, OUTPUT); pinMode(BUTTON_PIN, INPUT); } void loop() { byte buttonState = digitalRead(BUTTON_PIN); if (buttonState != lastButtonState) { lastButtonState = buttonState; if (buttonState == LOW) { ledState = (ledState == HIGH) ? LOW: HIGH; digitalWrite(LED_PIN, ledState); } } } Permit's analyze the code.
Setup
#define LED_PIN viii #define BUTTON_PIN vii
Those defines are the aforementioned as before.
byte lastButtonState = LOW; byte ledState = Low;
We demand to create two global variables, to keep the state of the button and the LED. In the loop we'll use those variables to compare the previous land to the new state.
void setup() { pinMode(LED_PIN, OUTPUT); pinMode(BUTTON_PIN, INPUT); } The void setup stays the same. Nosotros merely fix the mode for both pins.
And now the serious stuff is coming. We enter the void loop function.
Monitor the push button'south land
void loop() { byte buttonState = digitalRead(BUTTON_PIN); The first thing we exercise is to read the button'south country and to store it inside a new local variable.
if (buttonState != lastButtonState) { And so we can compare the current state to the last one (from the previous execution of the loop function). iv possibilities here:
- LOW -> LOW (last -> current).
- Depression -> HIGH.
- HIGH -> Depression.
- HIGH -> HIGH.
With the condition, nosotros merely enter the next block of code if the current and last state are different. If the 2 states are the aforementioned, and so we don't enter the if and the loop function is finished for this turn.
lastButtonState = buttonState;
Besides, now that we accept the information we desire, we directly shop the electric current state into the final state variable, then that nosotros have the correct value for the next fourth dimension we enter the loop.
if (buttonState == LOW) { At this point we have only two possibilities left:
- Either the previous land was Low and the current state is High (not pressed to pressed).
- Or the previous state was HIGH and the current land is Depression (pressed to not pressed).
We are simply interested in the second option, so here we just have to check if the electric current button's land is Low. If that'due south the case, we can now plough the LED on or off.
Toggle the LED when the push button has been released
ledState = (ledState == Loftier) ? Low : Loftier;
Here nosotros toggle the state of the LED. I'yard non a large fan of i-liners but this i is really scattering when you only demand to toggle a land. This will save you 3-four lines of code for something really trivial.
Here'due south the template for this 1-liner: (condition to evaluate) ? if true utilise this value : if faux use this value.
So, if the LED is currently powered on (ledState == Loftier), we assign the value LOW. If the LED is powered off (ledState != High), nosotros assign the value Loftier.
digitalWrite(LED_PIN, ledState); } } }
And the final thing we need to practice is of form to physically gear up the land for the LED, with the new computed state.
Turn LED on and off with button – using debounce
Ane matter you might find with the previous experiment: sometimes when you press and release the button, the LED'south state doesn't alter, or blinks chop-chop multiple times.
This is because the button is physically billowy when yous press information technology. Thus, many simulated positives will be interpreted by the Arduino. What you can do to prevent that is to add a debounce delay in your code. For example, you tin can decide that when the program detects a change in the button'south state, it will wait 50 milliseconds before considering another alter viable.
Allow's add together a few lines to our previous code.
The improved code
#define LED_PIN 8 #define BUTTON_PIN 7 byte lastButtonState = Low; byte ledState = LOW; unsigned long debounceDuration = l; // millis unsigned long lastTimeButtonStateChanged = 0; void setup() { pinMode(LED_PIN, OUTPUT); pinMode(BUTTON_PIN, INPUT); } void loop() { if (millis() - lastTimeButtonStateChanged > debounceDuration) { byte buttonState = digitalRead(BUTTON_PIN); if (buttonState != lastButtonState) { lastTimeButtonStateChanged = millis(); lastButtonState = buttonState; if (buttonState == LOW) { ledState = (ledState == Loftier) ? Low: HIGH; digitalWrite(LED_PIN, ledState); } } } } Now, if y'all run this programme, you won't have any trouble with the LED'south state being changed quite randomly when you printing/release the push.
And here is how we achieve that.
Debounce explained
unsigned long debounceDuration = l; // millis unsigned long lastTimeButtonStateChanged = 0;
We create 2 new global variables:
- I to decide how long nosotros want to wait earlier validating a second alter in the push's state. Here it means that if the state changes, whatever changes later on that in the next 50 milliseconds will be ignored. 50 millis is a skillful value, you tin experiment with lower and upper values to bank check the behavior.
- Another one to keep the last fourth dimension the state was changed, so we have a starting point to compare to.
void loop() { if (millis() - lastTimeButtonStateChanged > debounceDuration) { So, in the loop, we merely start the button/LED functionality if enough time has passed since the last fourth dimension the button'south land was inverse.
To exercise that information technology's quite unproblematic: we compare the duration since the terminal update fourth dimension to the required debounce duration.
if (buttonState != lastButtonState) { lastTimeButtonStateChanged = millis(); Once the debounce filibuster has been passed, so we can practice what we did earlier. And don't forget to update the starting point for the "debounce timer" merely after you detect a modify in the button'due south state. Then, the side by side fourth dimension the program enters the loop, it will await for l milliseconds (or the value yous've chosen) to detect new changes in the button'southward land.
Conclusion – Arduino plough Led ON and OFF with button
In this tutorial yous take seen how to build an Arduino circuit with an LED and a button, and also how to control this circuit to plough the LED on and off with the push button.
Even if information technology's a rather simple application, there are many ways to program it. Y'all can power on the LED but when the button is pressed, or make the LED glimmer when you release the button, and then on.
Another style to write the code (for the exact same functionalities) is to use Arduino interrupts – available for the boards having interrupt pins.
To get further from here, check out:
- Control multiple LEDs with a push push.
- Arduino program with LED, button, and potentiometer.
Source: https://roboticsbackend.com/arduino-turn-led-on-and-off-with-button/
0 Response to "And Then the Searchlight Which Has Been Turned on the World Was Turned Off Again"
Post a Comment